Home / Blog / REALTIME MALWARE PROTECTION USING CLAMAV “clamonacc” DAEMON
REALTIME MALWARE PROTECTION USING CLAMAV “clamonacc” DAEMON

By EKbana on May 10, 2023
7m read
ClamAV is an open-source antivirus engine that is commonly used to scan files for viruses and malware. Mainly used in Linux and Unix servers, It is a popular choice among system administrators and security professionals because of its effectiveness, reliability, and flexibility. In this blog post, we will guide you through the process of installing ClamAV on your Linux-based operating system and configure ClamAV to perform on-access scanning.
ClamAV is an open-source antivirus engine that is commonly used to scan files for viruses and malware. Mainly used in Linux and Unix servers, It is a popular choice among system administrators and security professionals because of its effectiveness, reliability, and flexibility. In this blog post, we will guide you through the process of installing ClamAV on your Linux-based operating system and configure ClamAV to perform on-access scanning.
But first lets discuss about on-access scanning. On-access scanning is a type of antivirus or anti-malware scanning that is performed automatically and in real-time as files are accessed by the system or user. This means that the antivirus or anti-malware software checks each file for viruses or malware as it is opened, copied, downloaded, or otherwise accessed, rather than waiting for a scheduled or manual scan to take place. This feature protects the web server against malwares in real time which makes it a very good tool to have in someone’s arsenal.
Installation:
So lets start by installing ClamAV and respective daemons. For that we have to follow the steps described below.
STEP 1: Update the System
In order to install ClamAV we have to make sure that our system is up to date. In order to update our system we have to run the following command.
sudo apt-get update && sudo apt-get upgrade
STEP 2: Install ClamAV
We can use apt to download ClamAV packages in debian based linux. Similarly we can use
sudo apt-get install clamav
This command will insSTEP 4:tall ClamAV along with its daemon.
STEP 3: Update ClamAV
After installing ClamAV, it is essential to update its virus database. To update ClamAV, run the following command in your terminal:
sudo freshclam
This command will update the virus database for ClamAV.
STEP 4: Configure clamonacc
Edit the ClamAV configuration file located at /etc/clamav/clamd.conf (file name may change according to linux distributions). For a very simple configuration, follow these steps:
- Open `clamd.conf` for editing
- Specify the path(s) you would like to recursively watch by setting the `OnAccessIncludePath` option
- Set `OnAccessPrevention` to `yes`
- Check what username `clamd` is running under
- Set `OnAccessExcludeUname` to `clamd`’s uname
- Save your work and close `clamd.conf`
A simple example of a configuration file is shown below. Here I have configured clamonacc to monitor the /tmp and /var/tmp folder for malwares.
#Automatically Generated by clamav-daemon postinst
#To reconfigure clamd run #dpkg-reconfigure clamav-daemon
#Please read /usr/share/doc/clamav-daemon/README.Debian.gz for details
LocalSocket /var/run/clamav/clamd.ctl
FixStaleSocket true
LocalSocketGroup clamav
LocalSocketMode 666
# TemporaryDirectory is not set to its default /tmp here to make overriding
# the default with environment variables TMPDIR/TMP/TEMP possible
User clamav
ScanMail true
ScanArchive true
ArchiveBlockEncrypted false
MaxDirectoryRecursion 15
FollowDirectorySymlinks false
FollowFileSymlinks false
ReadTimeout 180
#fdpass yes
MaxThreads 12
MaxConnectionQueueLength 15
LogSyslog true         #forwards clamav logs to syslog
LogRotate true
LogFacility LOG_LOCAL6
LogClean false
LogVerbose false
PreludeEnable no
PreludeAnalyzerName ClamAV
DatabaseDirectory /var/lib/clamav
OfficialDatabaseOnly false
#OnAccessMountPath /
OnAccessIncludePath /opt/          #monitors files in /opt directorry
OnAccessIncludePath /tmp/           #monitors files in /tmp directory
OnAccessIncludePath /var/tmp/      #monitors files in /var/tmp directorry
OnAccessPrevention yes            # preventes execution if file matches the matches the signatures in its signature database
OnAccessExtraScanning yes
OnAccessExcludeUname clamav
User root
AllowSupplementaryGroups true
#OnAccessExcludeUname root
SelfCheck 3600
Foreground false
Debug falseREDTIGER’S HACKIT LAB SOLUTIONS ( LAB 7, 8, 9 AND 10)
ScanPE true
MaxEmbeddedPE 10M
ScanOLE2 true
ScanPDF true
ScanHTML true
MaxHTMLNormalize 10M
MaxHTMLNoTags 2M
MaxScriptNormalize 5M
MaxZipTypeRcg 1M
ScanSWF true
ExitOnOOM false
LeaveTemporaryFiles false
AlgorithmicDetection true
ScanELF true
IdleTimeout 30
CrossFilesystems true
PhishingSignatures true
PhishingScanURLs true
PhishingAlwaysBlockSSLMismatch false
PhishingAlwaysBlockCloak false
PartitionIntersection false
DetectPUA false
ScanPartialMessages false
HeuristicScanPrecedence false
StructuredDataDetection false
CommandReadTimeout 30
SendBufTimeout 200
MaxQueue 100
ExtendedDetectionInfo true
OLE2BlockMacros false
AllowAllMatchScan true
ForceToDisk false
DisableCertCheck false
DisableCache false
MaxScanTime 120000
MaxScanSize 100M
MaxFileSize 25M
MaxRecursion 16
MaxFiles 10000
MaxPartitions 50
MaxIconsPE 100
PCREMatchLimit 10000
PCRERecMatchLimit 5000
PCREMaxFileSize 25M
ScanXMLDOCS true
ScanHWP3 true
MaxRecHWP3 16
StreamMaxLength 25M
LogFile /var/log/clamav/clamav.log
LogTime true
LogFileUnlock false
LogFileMaxSize 0
Bytecode true
BytecodeSecurity TrustSigned
BytecodeTimeout 60000
OnAccessMaxFileSize 5M
STEP 5: Run the ClamAV and clamonacc service.
Now we have to run clamd with elevated permission and run the clamonacc service.
sudo clamd
sudo clamonacc
Note: Sometimes we may encounter permission issues while running clamonacc service. This is because the /var/run/clamav directory is missing and the clamav service account cannot create the respective directory because of permission issues.
ERROR: Fri Apr 14 13:45:15 2023 -> LOCAL: Could not create socket directory: /var/run/clamav: Permission denied
ERROR: Fri Apr 14 13:45:15 2023 -> LOCAL: Socket file /var/run/clamav/clamd.ctl could not be bound: No such file or directory
If such issues and encountered we have to create the respective directory and assign the respective permission and owner of the directory to the clamav user.
sudo mkdir /var/run/clamav
chown clamav:clamav /var/run/clamav
TEST FOR SUCCESS
If everything went well, ClamAC On-Access scanner will run on the background and actively scan the directories specified with OnAccessIncludePath. We can test this by downloading an eicar file (file that is designed test the response of antivirus products) to the monitored directory and trying to access it. If the service is running successfully we will be presented with “Operation not permitted” message even when we are trying to access the file as the root user.
curl https://secure.eicar.org/eicar.com -o /tmp/test.txt # downloading the eicar file
cat /tmp/eicar.txt
If everything went well, we will not be able to access the file even if we are the root user.

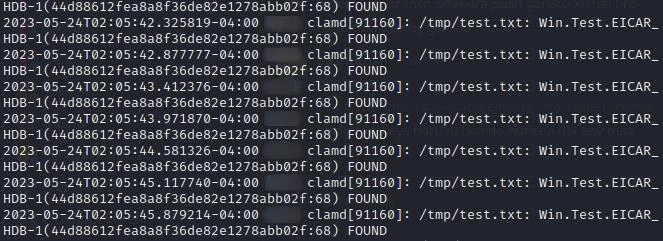
These events are logged and can be viewed from /var/log/clamav/clamav.log and from syslog (We need to set LogSyslog to true in clamd.conf file to forward logs to syslog). These logs can be used by SIEM Solutions to raise alerts and perform investigations for Threat intelligence.
Note: ClamAV on-access scanning can consume a significant amount of system resources, so it is important to configure ClamAV appropriately for your system and workload. We can also adjust the OnAccessPrevention and OnAccessExcludePath directives in the ClamAV configuration file to customize how ClamAV responds to infected files. For more information on configuring ClamAV, we can consult the ClamAV documentation or run man clamd.conf.
CONCLUSION
ClamOnAcc is a powerful tool that can help Linux users monitor directories for malware and viruses, allowing them to identify and remove potential threats before they can cause harm to their system. By working in conjunction with ClamAV, ClamOnAcc can improve the performance of ClamAV scans by reducing I/O operations and using multiple CPU cores.
Overall, ClamOnAcc is a powerful tool that can help Linux users maintain a secure and protected system, and is highly recommended for anyone looking to improve their system’s security.